

Every parent faces the daily challenge of keeping their child’s smile bright while fighting the struggle to make toothbrushing enjoyable and effective. Building healthy habits early matters, but finding a routine that fits busy family life can be tough. By creating a child-friendly brushing station and teaching faster, thorough techniques, you set the stage for stress-free oral care that motivates your child and protects their dental health.
Table of Contents
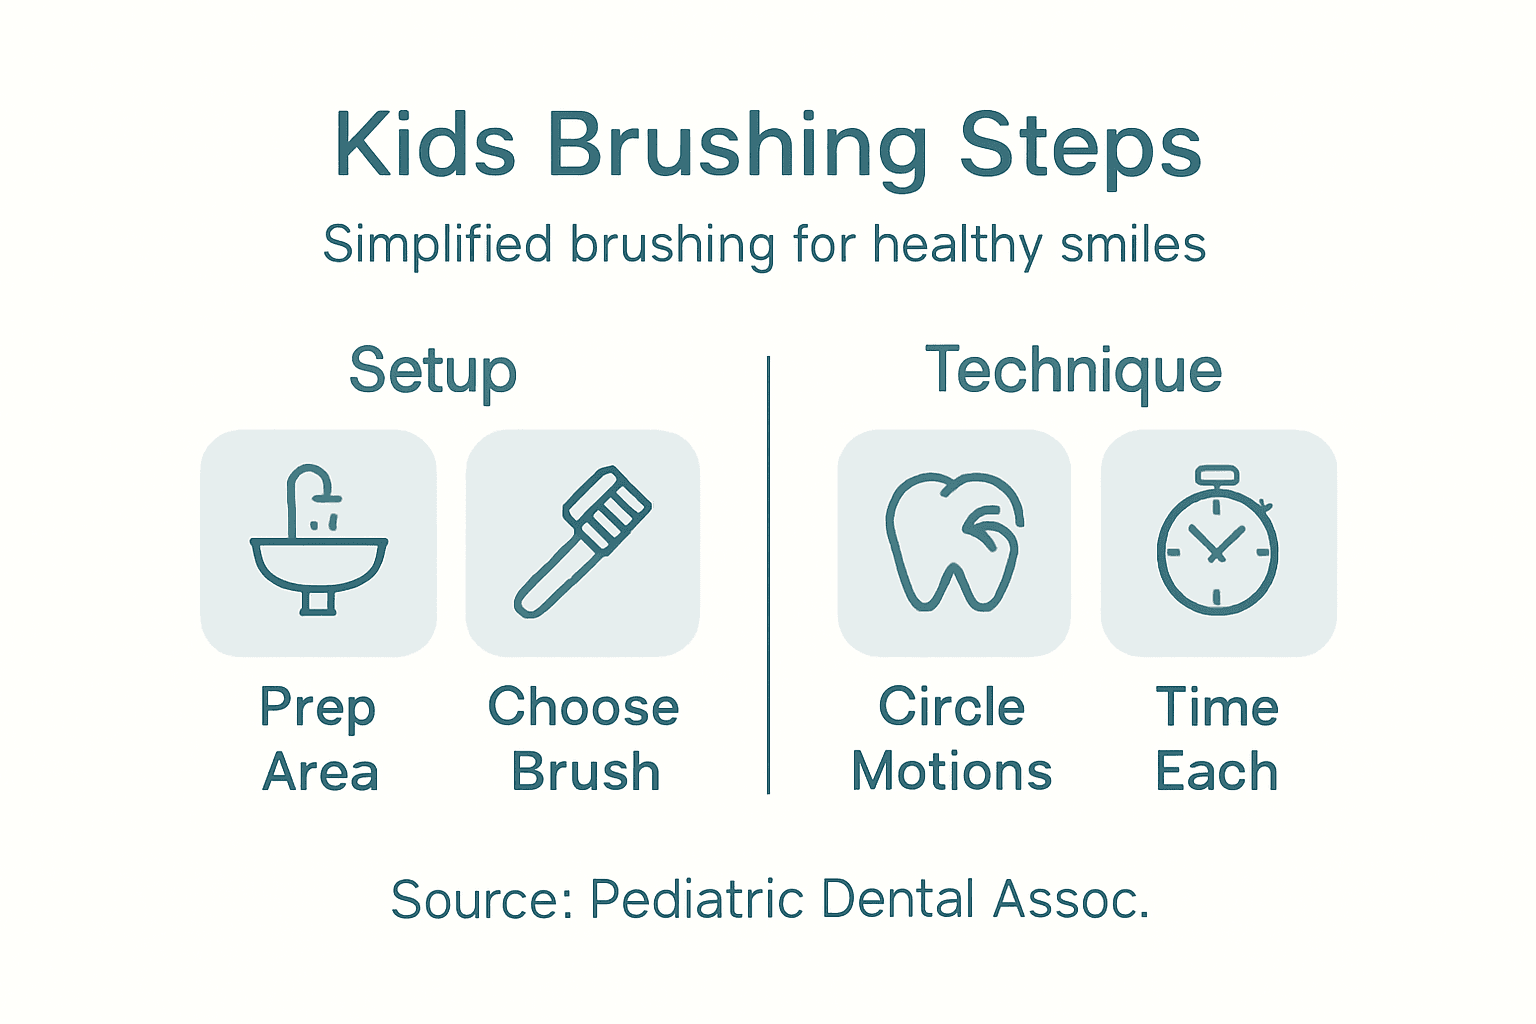
- Step 1: Prepare A Child-Friendly Brushing Station
- Step 2: Introduce The Faster Brushing Technique
- Step 3: Demonstrate The 20-Second Brushing Method
- Step 4: Guide Your Child To Use The Brush Independently
- Step 5: Check For Complete Plaque Removal
Quick Summary
| Key Insight | Explanation |
|---|---|
| 1. Create a child-friendly station | Design a fun dental hygiene space with accessible supplies to make brushing enjoyable for children. |
| 2. Teach efficient brushing techniques | Use a 45-degree angle and circular motions to ensure a quick, thorough clean in minimal time. |
| 3. Implement the 20-second method | Break brushing into four quadrants, focusing on each for 20 seconds to ensure thorough cleaning. |
| 4. Encourage independence in brushing | Gradually reduce guidance to help children develop confidence and self-care skills in their oral hygiene routine. |
| 5. Check for plaque removal effectively | Use disclosing tablets and other methods to ensure all plaque is removed, making dental care more interactive. |
Step 1: Prepare a child-friendly brushing station
Creating an engaging and organized dental hygiene space helps transform toothbrushing from a chore into an enjoyable routine for children. Your goal is to design a station that makes oral care feel fun, accessible, and age-appropriate.
Start by selecting a bathroom area with good lighting, a sturdy step stool for shorter children, and a child-height mirror. The NHS recommends creating an environment that supports consistent tooth care habits. Consider these essential elements for your child-friendly brushing station:
- Safe and accessible counter space
- Colorful, child-sized toothbrush holder
- Designated spot for toothpaste and rinse cup
- Removable fun stickers or decorations
- Bright, washable hand towel
Organize supplies in a way that encourages independence. Place toothbrushes, toothpaste, and rinse cups within easy reach, but ensure younger children are still supervised during brushing. Use a dedicated tray or organizer with compartments to keep everything neat and prevent cross-contamination.
A well-designed brushing station transforms dental care from a routine task into an exciting daily adventure for kids.
Consider personalizing the space with your child’s favorite colors, characters, or themes to boost their excitement about oral hygiene. A magnetic whiteboard for tracking brushing times or a sticker reward chart can also make the experience more interactive and motivating.
Pro tip: Replace toothbrushes every three months and store them upright in a clean, dry area to prevent bacterial growth.
Step 2: Introduce the faster brushing technique
Mastering an efficient toothbrushing technique can transform oral hygiene from a time-consuming chore into a quick, effective daily routine for children. The goal is to teach a method that ensures thorough cleaning in minimal time.
Efficient brushing techniques focus on strategic tooth coverage and precise movements. Learn these key strategies to help your child brush faster and more effectively:
- 45-degree angle brush positioning
- Short, gentle circular motions
- Cover all tooth surfaces systematically
- Use light, consistent pressure
- Spend approximately 30 seconds per quadrant
Break down the brushing process into manageable segments. Start with the outer surfaces of teeth, then move to inner surfaces, and finally clean the chewing surfaces. This systematic approach ensures no area is missed while maintaining a swift pace.
Quick, targeted brushing can be just as effective as longer, less focused sessions when done correctly.
Encourage your child to think of brushing like a fun game - challenge them to complete a thorough clean within two minutes. Visual timers, musical toothbrushes, or smartphone apps can make the process more engaging and help them track their brushing duration.
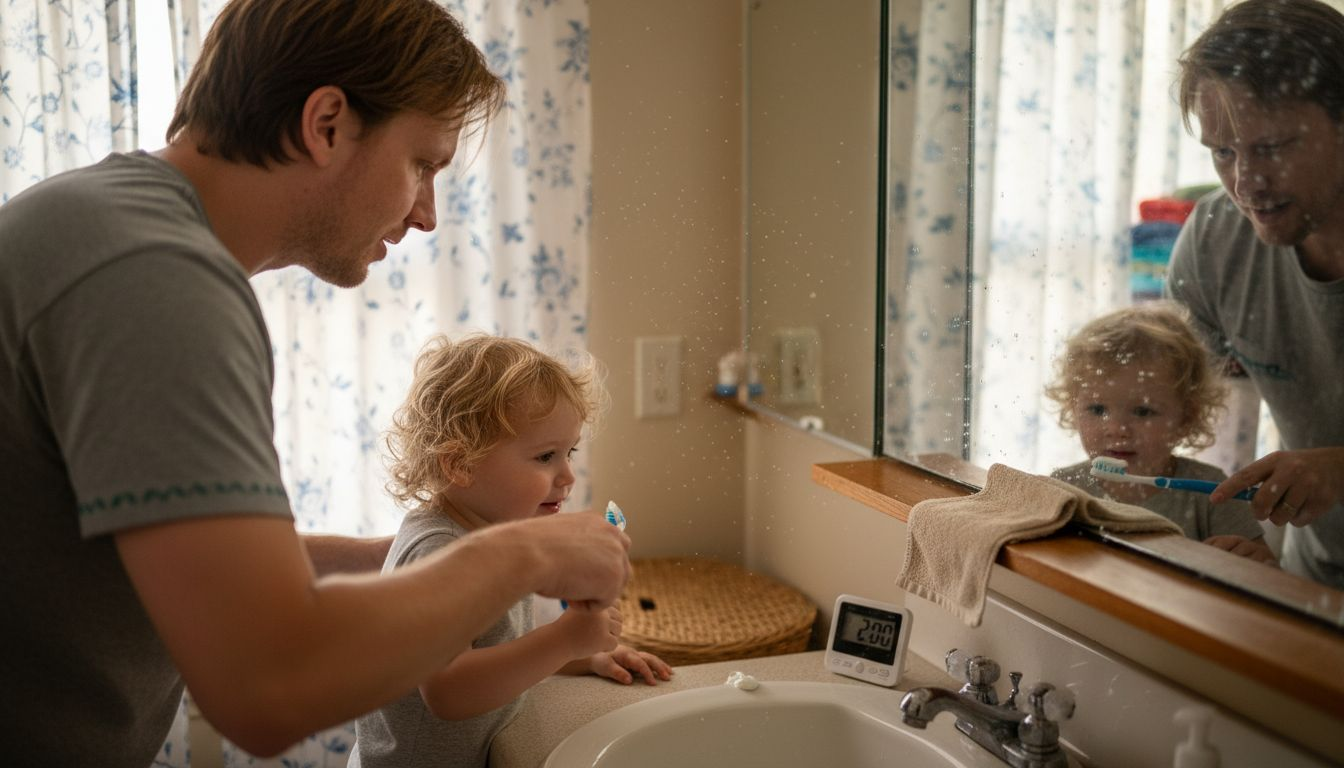
Pro tip: Practice the brushing technique together in front of a mirror, demonstrating each step to help your child understand and mimic the correct method.
Step 3: Demonstrate the 20-second brushing method
Mastering the 20-second brushing method transforms oral hygiene from a lengthy chore into a quick, targeted cleaning routine that ensures comprehensive dental care. By breaking down the brushing process into precise, efficient segments, you can help your child develop an effective and time-conscious dental hygiene habit.
Supervised toothbrushing guidelines emphasize the importance of strategic brushing duration. Here’s how to implement the 20-second technique:
- Divide mouth into four quadrants
- Spend exactly 20 seconds per quadrant
- Use gentle, systematic circular motions
- Maintain consistent brush angle
- Keep movements light and controlled
Start by showing your child how to mentally divide their mouth into four sections: upper right, upper left, lower right, and lower left. Use a visual aid like a small timer or smartphone app to help them track each 20-second segment. Encourage them to focus on thorough coverage rather than rushing.
Precision matters more than speed when cleaning each tooth surface.
Practice the technique together, demonstrating how to systematically move the brush across each quadrant. Use a mirror to help your child understand the correct angle and motion. Make the process interactive by turning it into a fun, timed challenge that rewards thorough cleaning.
Pro tip: Use a small kitchen timer or smartphone app with visual cues to help your child track the 20-second intervals for each mouth quadrant.
Step 4: Guide your child to use the brush independently
Transitioning your child toward independent tooth brushing is a critical developmental milestone that requires patience, strategic guidance, and consistent support. The journey toward self-managed dental hygiene helps build confidence and lifelong healthy habits.
Dental professionals recommend gradually introducing independent brushing around ages 7-8, when children develop sufficient manual dexterity and understanding. Here are strategies to support this transition:
Here’s a quick comparison of supervised versus independent brushing for children:
| Approach | Recommended Age Range | Parental Role | Child Benefit |
|---|---|---|---|
| Supervised Brushing | 3-7 years | Guides technique | Builds good habits, ensures thorough cleaning |
| Independent Brushing | 7+ years | Monitors progress | Boosts confidence, develops self-care skills |
- Start with hand-over-hand guidance
- Use child-sized toothbrushes
- Practice in front of a mirror
- Break down brushing into simple steps
- Provide positive reinforcement
Begin by physically guiding your child’s hand, demonstrating the correct brushing motion and technique. Slowly reduce physical guidance as they become more comfortable, watching their technique and offering gentle corrections. Focus on making the process feel like a fun, collaborative learning experience rather than a strict instruction.
Independence in oral care builds confidence and establishes lifelong healthy habits.
Consider creating a visual checklist or routine chart that outlines each step of tooth brushing. This helps children remember the sequence and feel a sense of accomplishment as they master each component of independent dental care.
Pro tip: Create a reward system that celebrates consistent, thorough brushing to motivate your child’s progress toward independent oral hygiene.
Step 5: Check for complete plaque removal
Ensuring thorough plaque removal is crucial for maintaining your child’s dental health and preventing tooth decay. This step transforms tooth brushing from a routine task into an interactive learning experience that teaches hygiene awareness.
Toothbrushing guidance emphasizes systematic plaque detection and removal techniques that help children understand oral cleanliness. Here are practical methods to verify complete plaque elimination:
- Use disclosing tablets or solution
- Check all tooth surfaces carefully
- Feel for smooth, clean tooth texture
- Look for consistent color and shine
- Identify and re-brush missed areas
Disclosing tablets work like a dental detective, temporarily staining plaque with a harmless color that reveals exactly where brushing missed. These tablets turn plaque into bright pink or blue spots, making invisible buildup immediately visible to children and parents.
This summary illustrates common plaque detection tools and their advantages:
| Tool | How It Works | Benefit for Children |
|---|---|---|
| Disclosing Tablet | Stains plaque color | Makes missed spots visible |
| Handheld Mirror | Visual inspection | Encourages self-awareness |
| Tongue Assessment | Feels for roughness | Promotes sensory learning |
Visual feedback transforms plaque removal from a guessing game into a precise cleaning process.
Teach your child to run their tongue across their teeth after brushing, feeling for a smooth, clean surface. Rough or sticky areas indicate missed plaque that needs additional attention. Make this inspection a fun, interactive moment that empowers your child to take ownership of their oral hygiene.
Pro tip: Conduct plaque checks in good lighting using a handheld mirror to help your child learn to identify and target missed spots.
Discover a Faster Path to Kids’ Superior Dental Health
Brushing kids’ teeth properly can be a challenge especially when spending the recommended time every day feels like a struggle. This guide highlights the importance of effective techniques like the 20-second brushing method and independent brushing skills but we know maintaining those routines consistently isn’t always easy. Families often face the pain point of squeezing thorough oral care into busy schedules while keeping kids engaged and motivated.
That is why Y-Brush offers an innovative solution that transforms kids’ brushing habits by delivering a superior plaque-free clean in just 20 seconds. Designed to fit seamlessly into everyday life, Y-Brush helps parents support their child’s oral health goals of complete plaque removal and faster brushing without compromising quality. Experience how this breakthrough product complements the expert steps covered in the Kids Brushing Guide by making brushing effective, quick, and enjoyable.
Take the next step toward empowering your child with a fresh confident smile today. Visit https://y-brush.co to learn more and bring better dental health home with a brushing revolution.
Frequently Asked Questions
How can I create a fun brushing station for my child?
To create an engaging brushing station, select a well-lit bathroom area and include a sturdy step stool for shorter children. Organize supplies like a colorful toothbrush holder, designated spots for toothpaste, and even fun decorations to make the space exciting.
What is the fastest technique for my child to brush their teeth?
The fastest technique involves positioning the toothbrush at a 45-degree angle and making short, gentle circular motions for about 30 seconds per quadrant. Break down the brushing process into manageable sections to ensure all areas are cleaned efficiently.
How do I teach my child the 20-second brushing method?
To teach the 20-second brushing method, divide your child’s mouth into four quadrants and spend exactly 20 seconds on each. Use a visual timer to help them track their time and encourage them to thoroughly cover each area without rushing.
When should I encourage my child to brush independently?
You should start encouraging your child to brush independently around ages 7-8 when their manual dexterity has developed. Begin with guided practice, gradually reducing assistance as they gain confidence and ability in their brushing technique.
How can I check if my child has removed all plaque after brushing?
To check for complete plaque removal, use disclosing tablets that color any missed plaque, making it visible. After brushing, encourage your child to run their tongue over their teeth to feel for smoothness, indicating effective cleaning.
What are the benefits of organizing my child’s brushing materials?
Organizing your child’s brushing materials fosters independence and encourages a daily routine. By keeping toothbrushes, toothpaste, and cups within easy reach, you help your child take ownership of their dental hygiene habits.


